FAIL SAFE ANTI WET-SUMPING VALVE
For the un-iniated, Classic British motorcycles are prone to wet-sumping after an extended lay-over period, such as Canada’s long cold winters, and in some bad cases even after a couple of weeks. Because of their dry sump design where oil is stored in a separate tank, then fed through the engine under pressure from the oil pump and returned to the tank from the bottom of the crankcase by a “scavenger” pump or return pump, oil tends to leak through the oil pump and collect at the bottom of the crankcase. The more worn the pump the worse the bypass leak is. Gear type pumps (Norton and AJS/Matchless Twins) are worse than plunger type pumps (Triumph/ AJS & Matchless singles) Whilst slightly worn pumps will deliver pressurized oil satisfactorily and not be in need of an expensive overhaul or replacement, the wet-sumping problem is a tiresome nuisance on start-up after lay-over, and in extreme cases can cause excess crankcase pressure with oil leaking all over and even blown gaskets, before the scavenger pump has time to pump the excess oil back into the tank.
Not to mention clouds of blue smoke until the oil is cleared. My neighbour came running one spring start up thinking my garage was on fire!
There has been much written about solutions for curing wet-sumping. Commercial parts suppliers offer various types of anti wet-sumping valves with prices varying from $35 to $300. The simplest and cheapest consist of a steel ball closing on a seat under spring pressure and rely on the pumps suction to draw the ball off the seat and allow the life preserving oil to flow to the pump. The internet is full of stories about what happens when these valves DON”T open and the spectacular melt-downs that take place between the riders legs shortly afterwards and not far down the road!
The simplest of all is to install an on/off valve on the hose between the tank and the pump. This of course relies on the rider/owner remembering to turn it off before lay-over and most importantly, to turn it ON BEFORE RE-STARTING!
Therein lies the problem. Murphy always intervenes and there are as many internet stories about how he forgot and trashed a first out restored beauty that he had been restoring for the last five years!
The most expensive valves incorporate some form of fail safe device that does not allow the bike to be started until the valve is opened. The other option is to go the expensive route and rebuild or renew an oil pump which is still giving a more than adequate oil delivery. It is also not unknown for some rebuilt pumps to still leak oil past.
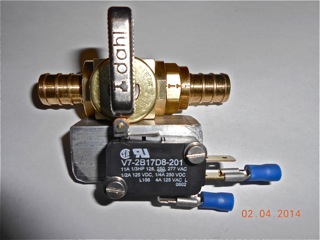
Always on the look-out for a better and cheaper way I bought a ball type lever valve with hose barb on both ends from Rona for under $10 and a Honeywell model WWG24A302 3 terminal limit switch from Acklands Grainger for $4.63 I drilled two small holes in the brass valve body and tapped them to accept two machine screws. This has to be done like porcupines making love ie; CAREFULLY! Not too deep so as not to interfere with the stainless steel ball or the teflon seals. A small bracket was made using 1″ aluminium angle cut to size and drilled accordingly, with slotted holes so that the switch could be positioned so that the heel of the valve lever would actuate the switch arm/roller. With one ground terminal and two other make and break terminals it was possible to wire the limit switch to cut out the ignition switch or ground out a magneto through the stop/grounding button. Thus the bike will not start until the valve has been opened and that life-preserving golden liquid is flowing to that oil pump and giving a finger to our old friend Murphy!
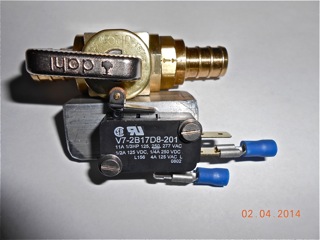
Valve open- switch arm off contact.