In May 2022 John Thompson gave our memebers an outstanding presentation on “threads”.
Everything you ever wanted to know about nut and bolt threads. Very informative lesson covering the finer details on why some nuts spin on easy and some don’t.
 Antique Motorcycle Club of Manitoba
Manitoba Motorcycle Club est.1911
Tech articles to help repair and maintain a motorcycle:
In May 2022 John Thompson gave our memebers an outstanding presentation on “threads”.
Everything you ever wanted to know about nut and bolt threads. Very informative lesson covering the finer details on why some nuts spin on easy and some don’t.
from Tom Hesaom
By Tom Hesom
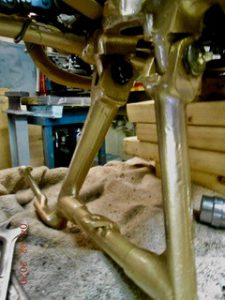
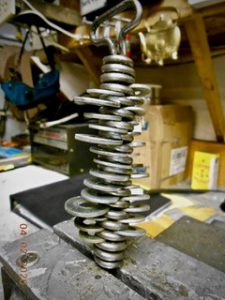
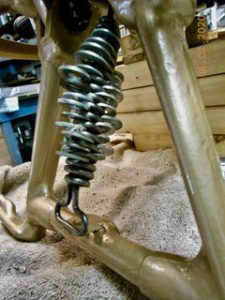
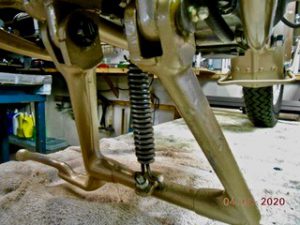
Most restorers reach the stage where the freshly painted centre stand has to be replaced, most likely with a new strong spring. And most restorers have battled to stretch this very strong spring to fit over the fixing points with some sort of lever mechanism, skinned knuckles, much tongue work and less-than-polite expletives!
Here is an easy way- – – –
By Ken Charleton
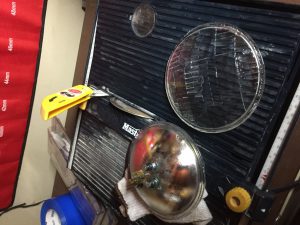
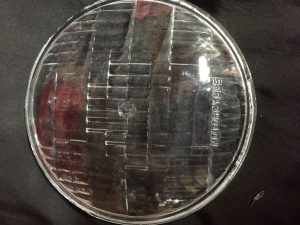
I needed a glass headlight lens for a 1974 RD 350 Yamaha. Kim Houde gave me an old 5 3/4-inch seal beam that was burnt out. I just needed the lens but didn’t know how to cut the seal-beam. I ended up using a tile cutter (with water) just holding it freehand over the smooth diamond blade. Two minutes and the job was done.
This wasn’t a glass lens glued to a plastic shell, it was your typical automotive round seal beam. One of those jobs that I kept putting off because I was pretty sure it would end badly. I was more surprised that the seal-beam didn’t shatter in my hands than how easy the job was.
All the 750cc Norton Commando’s and the earlier 850cc models were fitted with a more-or-less rectangular air filter with two shaped rubber hose connectors from carbs to the filter front plate.
Restorers will know what a difficult job it is to assemble the carbs, connecting hoses and filter between engine and frame, and then afterwards how difficult it is just to change a filter element. Only in 1974 with the MK2A 850’s, did Norton’s change to a much simpler and easy-to-get-at pad type air filter which could be changed in minutes.
Setting up and tuning carburetors with BSA or Triumph twins with their dual easy-removable “pancake” air filters was easy, enabling one to get into both carb intakes to “finger feel,” or the other trick of inserting two same-sized drill bits shank first under the slide cut-away’s, and watch to see them dip evenly as you tweak the throttle.
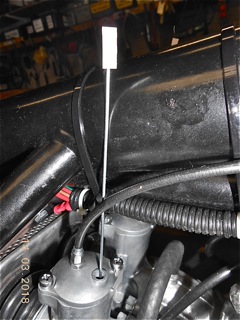
Final carb setting is not easy on a Commando because it is NOT a five minute job to get into the carb intakes to adjust the all-important simultaneous slide lift. Much easier way is to use two pieces of straight wire inserted through the top cap usually blanked off holes for choke slide, and watch the tips rise together. Easer to see if you glue a piece of white board on top of the wire. This all assuming of course that you have as most British bike owners of Amal carbed bikes have done, and discarded the choke mechanism, and again what many Commando owners have done and replaced the original air filter with K&N cone filters. If my carbs still had choke slides I would have drilled small holes in the carb tops to take the wire, then blocked them up again, rather than battle with taking that #@?!! air filter off and then on again!
CCcC
One of the most important jobs on any restoration is to re-build the carburetors, and before a re-build they need a thorough cleaning. There are numerous expensive acid-based carb cleaning liquids on the market, but a cheaper method that works is as follows ;–
1) Get hold of an old saucepan (pot) that is big enough to enable the carb components to lie on the bottom without being on top of each other. I have commandeered a pot that was going to be thrown out because it had been allowed to cook dry at some stage..
2) Fill it enough to just cover the carb parts with a third each of water, white vinegar and lemon juice, ( the kind you can buy in a plastic bottle at the grocery store called ReaLemon)
3) Wait till she has gone shopping, and boil on her stove for about 20 minutes. (It must be bubbling and it stinks!)
4) Tip out the hot liquid and rinse several times with cold water.
5) Blow out excess water with an airhose through all the airways and lay out on a clean cloth and allow to dry.
6) The parts and air passages are beautifully clean but everything will be covered in a very fine grey powder which is easily brushed off with an old tooth brush or similar. If you want a nice dull shine, a soft brass bristle brush works fine (I bought a whole set including the brass bristle one, from Dolarama)
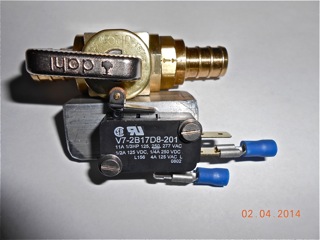
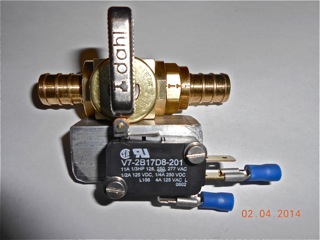
FAIL SAFE ANTI WET-SUMPING VALVE
For the un-iniated, Classic British motorcycles are prone to wet-sumping after an extended lay-over period, such as Canada’s long cold winters, and in some bad cases even after a couple of weeks. Because of their dry sump design where oil is stored in a separate tank, then fed through the engine under pressure from the oil pump and returned to the tank from the bottom of the crankcase by a “scavenger” pump or return pump, oil tends to leak through the oil pump and collect at the bottom of the crankcase. The more worn the pump the worse the bypass leak is. Gear type pumps (Norton and AJS/Matchless Twins) are worse than plunger type pumps (Triumph/ AJS & Matchless singles) Whilst slightly worn pumps will deliver pressurized oil satisfactorily and not be in need of an expensive overhaul or replacement, the wet-sumping problem is a tiresome nuisance on start-up after lay-over, and in extreme cases can cause excess crankcase pressure with oil leaking all over and even blown gaskets, before the scavenger pump has time to pump the excess oil back into the tank.
Not to mention clouds of blue smoke until the oil is cleared. My neighbour came running one spring start up thinking my garage was on fire!
There has been much written about solutions for curing wet-sumping. Commercial parts suppliers offer various types of anti wet-sumping valves with prices varying from $35 to $300. The simplest and cheapest consist of a steel ball closing on a seat under spring pressure and rely on the pumps suction to draw the ball off the seat and allow the life preserving oil to flow to the pump. The internet is full of stories about what happens when these valves DON”T open and the spectacular melt-downs that take place between the riders legs shortly afterwards and not far down the road!
The simplest of all is to install an on/off valve on the hose between the tank and the pump. This of course relies on the rider/owner remembering to turn it off before lay-over and most importantly, to turn it ON BEFORE RE-STARTING!
Therein lies the problem. Murphy always intervenes and there are as many internet stories about how he forgot and trashed a first out restored beauty that he had been restoring for the last five years!
The most expensive valves incorporate some form of fail safe device that does not allow the bike to be started until the valve is opened. The other option is to go the expensive route and rebuild or renew an oil pump which is still giving a more than adequate oil delivery. It is also not unknown for some rebuilt pumps to still leak oil past.
Always on the look-out for a better and cheaper way I bought a ball type lever valve with hose barb on both ends from Rona for under $10 and a Honeywell model WWG24A302 3 terminal limit switch from Acklands Grainger for $4.63 I drilled two small holes in the brass valve body and tapped them to accept two machine screws. This has to be done like porcupines making love ie; CAREFULLY! Not too deep so as not to interfere with the stainless steel ball or the teflon seals. A small bracket was made using 1″ aluminium angle cut to size and drilled accordingly, with slotted holes so that the switch could be positioned so that the heel of the valve lever would actuate the switch arm/roller. With one ground terminal and two other make and break terminals it was possible to wire the limit switch to cut out the ignition switch or ground out a magneto through the stop/grounding button. Thus the bike will not start until the valve has been opened and that life-preserving golden liquid is flowing to that oil pump and giving a finger to our old friend Murphy!
Rub with a cloth and “Ceramabrite”; the white paste your wife uses to clean her glass top stove. ( Make sure to take it when she is not looking! My wife remains eternally suspicious after I washed my motorcycle engine halves in her dish washer!)
For real stubborn marks grade 00 Superfine steel wool works wonders. ( Also to be found amongst her cleaning things!)
Only the more expensive “split” oil filters are now available from BMW, and this as a kit only for about $24 each, excluding shipping.
The “split” filter is made for machines fitted with oil coolers which seem to be in the minority. (I’ve never seen one, but then I’m no expert!)
The “straight” filter is obtainable from K&N Filters, Their part # KN161, for $7.98 each. My local Napa Auto Parts ordered in for me and shipping for two filters was a further $10. Admittedly this doesn’t include the all-important white “O” Ring. This can be ordered separately from your usual BMW supplier @ $1.97 each. Part # 11 421 337 098 According to the airhead “boffs” this used to be referred to as “the $1000 “O” Ring”, because of the rather spectacular consequences if it didn’t seal properly. Now with the passing of time and inflation it is “the $3000 “O”Ring”!
Moral of the story. DO replace the “O” Ring with a new one every time you change the oil and the filter.
PS Owners of older British bikes please ignore this advice. Your bike doesn’t even HAVE a filter and anyway, with the way they all leak oil,they don’t need a filter because the oil is always fresh!

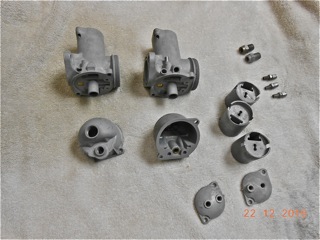
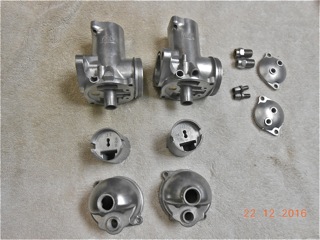
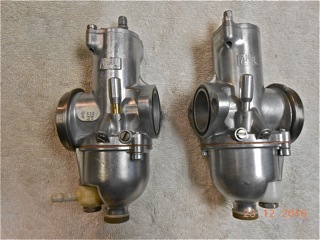
AMAL Concentric MK1 Carburetor Re- builds. By Tom Hesom
This is intended for those whose interest is in the restoration of British motorcycles fitted with Amal carbs, and directed more to machines built up from basket cases than to runners. Much has been written about these often maligned instruments by more knowledgeable “wrenchers” than I, so I don’t profess to be an expert, but I have “fiddled” with the confounded things for long enough to have learned a few things, and continue to learn more.
For instance my freshly restored Triumph Bonnie would only run on one side until John T found that one carb had no in-body pilot jet! More recently more trouble with my BSA Lightning only to find that one spray tube was missing from one carb. The spray tube is the brass tube visible through the bore and like the in-body pilot jet is not normally removed as it is a friction fit and has to be tapped into place.
Most troubles by far however are caused by wear between the carb body and the slide. Because Amals were built to a price dictated by the always-cash-strapped British motorcycle industry, they used the same soft alloy material for both body and slide which they knew as well as anybody was conducive to fast wear. This wear causes all sorts of problems but mainly the inability to get the machine to idle because of excess air being drawn past the slide.
Only solution is to buy new carburetors, but if it is a twin carb bike this can be expensive. New Amal MK1 carbs are available from Walridge Motors, Lucan, Ontario @ $200 each plus shipping and handling. If you have a Monobloc or an even earlier Amal, they are also available at about double this price. email; sales@walridge.com Web www.walridge.com
In my view a better option is to have your old carbs re-sleeved. The bore is honed out to true and the slide is sleeved with brass. This then obviates the same- metal problem and you have a BETTER than new instrument! (With the proviso of course that you also re-new any worn jets or needles at the same time) I sent my carb bodies and slides to Bruce Chessell in Ontario by ordinary Canada Post. Bruce did a magnificent job in under a week and returned them promptly without asking for advance payment! Said he would email me the price and return postage and I could send my cheque! Rare trust these days!
Cost $75-00 per carb = $150-00 plus postage $14-50 each way = $29-00 Total $179-00
Plus two Carb Kits (gasket sets) # CGS900 @ $3-00 ea 6-00
Plus two Tickler Conversion Kits (no more gas on finger!) @ $6-65 ea 13-30
Postage and Insurance 7-70
Overall cost $206-00 Bruce Chessell’s address; 314 Knightsbridge Rd,
Woodstock, ON
N4S 7C4 Email; bchessell@odyssey.on.ca
PS This price was even further reduced. The Right-hand carb body had other problems besides wear in the bore and slide and could not be used for re-sleeving. I put an ad in our newsletter and before it even came out Dave Pritchard said “How many do you want!?!” and for no charge! Thanks Dave! One of the many advantages of belonging to a super motorcycle club!
Another Tip for Twin Amal Carbs
If you have difficulty getting the slides to rise simultaneously by a feeling finger in each carb intake and have no-one to operate the twist-grip,
– – Here is the answer;- – –
Put two 1/8″ drill bits shank first into the carb mouths just under the slide cut-aways. (with air filters off of course.) Two thirds of the bits should stick out and hang down slightly. Adjust the cable adjusters until both bits drop simultaneously when you crack the throttle.
This way you can get both slides to rise evenly on your own. Then proceed in the usual way with both air filters back on, to set one carb idle at a time by removing one plug on fast idle and adjusting on the opposite side until they run smoothly, then reduce the revs to a nice idle with both plugs in and both sides firing.